Sunday, 28 January 2018

Saturday, 27 January 2018

Friday, 26 January 2018


Thursday, 25 January 2018
Evaluation - What have you learnt from your audience feedback?
At the start of December 2917, we completed our first draft of our music video. Our first draft was only 3 minutes long and did not have many effects included. We presented our first draft to the class and were given feedback from our classmates and our teachers. This feedback consisted of:
From the feedback we received we were able to moake changes to the video accordingly. We were really pleased with our final video.
We decided we wanted to get feedback from our final video so we created a couple surveys which I handed out to my A-Level media class and they filled them in. The first survey was a pre-video survey.

We decided to ask these questions to determine if our Target Audience was right.


"Shots of Phoebe going crazy could be broken up with some quick (sped-up) shots in between"
"Could sharpen some parts"
"Some editing needs to be cut more suddenly with the music"
"Needs more shots of Lucy|"
AND
"Good TV effect"
"First effect looks good - really trippy"
"Characterisation + acting was perfect"
"Transitions between each shot flows - ghosting effect matches trippy theme"
We decided we wanted to get feedback from our final video so we created a couple surveys which I handed out to my A-Level media class and they filled them in. The first survey was a pre-video survey.

We decided to ask these questions to determine if our Target Audience was right.


After the class filled out the surveys, they watched the video:
After they watched the clip, we got the class to fill out a post-video survey:
We got mainly got good feedback which showed us a realistic reaction to our video.


We also decided to do a individual interview with one of our classmates. We decided to interview a fellow media student because they know the conventions of our genre and can provide informed feedback.
OUR WEBSITE
Before we started creating our website we carried our someresearch into other websites so we could see how other artisits create band images and synergy throughout their websites. The main website we looked at were the Slaves website:


This was the first draft of our website. On this design we used images taken from our photoshoots for the background.and kept this throughout the website.The images we used were kaleidoscope pictures because we thought it would keep the synergy throughout the video and website. We showed the first draft to ou class and got feedback from them:
Do you want Lucy on the homepage?, too much kaleidoscope imagery, possibly more artist information added, quite dark,
Put interviews on too, possibly add a small biography, make the links stand out more to make it easier for the user to navigate


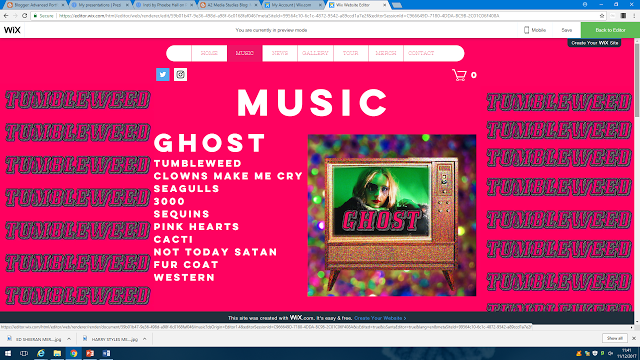
These are some pages from our finished website. Because of this feedback, we decided to create the whole website again. We decided to change the theme of the website from kaleidoscope
images to a plain pink background throughout the whole website. We choose the colour pink to reflect the pink set we used therefore keeping up the synergy and band image. It also made the website more aesthetically pleasing and easier to read and use. We also added a bio about the band and added more pages such as News page and Video page which contains interviews and behind the scenes footage.
We got feedback from our class which consisted of:
*Really good synergy links to your other media products
*Really easy to navigate around the website
*All tabs work
*Like the motion of the logo when you first click on it - good interactivity
*Good use of your images and digipak pictures and video snippets throughout the website
*Layout good
*Gallery shows good images
*News section gives good, useful information
We also created a survey - using survey monkey


We sent the survey out to other student to gain their feedback on the finished website.
The feedback we received was:
*Easy navigation
*Good merch
*All links worked
*Looked really nice
OUR DIGIPAK
We had to create a digipak that fitted our genre themes and should the band images clearly.
This is our first draft:

The overall feedback we got was positive, with it being no9ted that it is unique and attention grabbing. One suggestion was to tint the bottom left photo pink in order to better match the other photos. Our peers liked the grainy effect. Another suggestion was to try and incorporate glitter into it and for us to add borders, a song list and the title of the album. From this feedback we were able to edit our digipak to produce a better product:

OUR MAGAZINE COVER
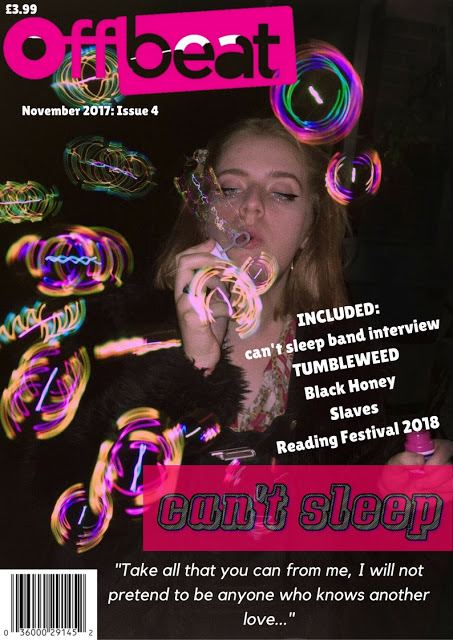
We created the magazine cover on a website called Canva. From the research we did, we decided to make the magazine on OffBeat magazine,

This is our first draft of our magazine:

The feedback we got from this was:
*Make Luicy's image stronger - take out the red eye and brighten her
*Make the background less grungy
*Make the text look more proffessional
*Add a barcode
Influenced by our magazine we also made a tour poster:

And a debut album launch poster:

Tuesday, 23 January 2018


Sunday, 21 January 2018
Evaluation Q3 Plan
During filming our predominant choice of camera was a Sony Cybershot
HX300 – this allowed us to get clear footage quality at 720p and 50x optical
zoom, which came in handy for close-ups, which we used a lot. This camera was
used to film both of our scenes, with the footage being saved onto a 16gb
memory card and downloaded onto the computer via a flash drive which allowed a
memory card to be inserted into it. We saved our footage in the media drive and
Lucy’s files in order to ensure we had it available in two file locations
should any footage somehow become corrupted.
In addition to the DSLR camera, we also used iPhone 6 and 7 cameras to
film our glass bottle smashing and our interview. We found the iPhone camera
quality was good enough to provide clear footage of the glass bottle shards and
glitter - while the iPhone 7 footage was unable to be used, the footage Lucy
filmed on her iPhone 6 was successfully implemented into various sections of
our video. These shots were uploaded to the computer via a USB cable connected
directly to Lucy’s iPhone, saved into a file named “glass videos” in order to
clearly separate and label the footage.
We utilised social media in order to promote and strengthen
our brand image and communicate with “fans”. We found that musical artists
often share their latest news and updates via twitter, Facebook and Instagram.
While we didn’t feel our target audience would be as present on facebook, we
decided it was vital to create twitter and Instagram accounts and post on them
as our characters Bea and Coco. We shared images taken onset and sneak peeks at
clips from the video, which artists often do in order to create hype for
upcoming events or videos. This is shown on synth-pop duo Empire Of The Sun’s
Instagram, which posted behind-the-scenes photos and small clips of an upcoming
music video.
Websites and programmes used in the music video process
include CANVA, Wix, Photoshop and of course Adobe Premiere.
CANVA was used to create our tour date poster, magazine
cover and advertising poster. This was a fairly easy programme to use as it
involved choosing a layout and fitting in your own images and text to suit the
design you wanted. Phoebe edited our magazine cover on Photoshop after creating
it on CANVA, and used a variety of tools in order to make the image look more
professional – this included using the burn effect in order to darken the
background and highlight Lucy as the main subject, minus red eye to reduce the
effects of the camera flash and the sponge effect to brighten Lucy and make her
the main focus.
Although Wix has templates available, Phoebe created the
website entirely from scratch, choosing to create an original design, as she
felt none of the templates suited the image we wanted to promote our band with.
The website carries our synergy through, with a bright pink background,
kaleidoscopic imagery and photos taken onset. It has mulitple pages to click
on, including a home page, merchandise, tour dates and a gallery. These all
work together to promote our band image and give enough information to create a
proffessional looking website.
Adobe Premiere Pro was the programme we used to edit our
video, and it allowed us to fully create the video we wanted and make it look
as accurate to our plans and ideas as possible. While we had previously used
basic Premiere skills for other tasks, making this music video allowed us to be
even more creative with effects and layering footage. We learnt new editing
skills along the way, as I mentioned, how to layer one piece of footage on top
another – we learnt this specifically so we would be able to create the illusion
that the scenes filmed in the pink room were playing on the television used in
the living room scenes. While there could have been a away for us to actually
play that footage on the television, the camera would have picked up static and
reflection from the glass screen itself, which would have looked shoddy and
unprofessional. In order to layer the footage, I placed one clip on top of the
other, cropped it to -13 either side and used the effcts “Roughen Edges” and
“Edge Feather”. These allowed the layered clip to blend seamlessly into the
clip below, giving it the look of actually being on the television.
In addition to these effects, we used Colour Balance,
Brightness and Contrast and changed the speed of some clips in order to either
make them in time with the song or speed them up in a way that made the actors
movements look very jarring, which we intended for certain parts of the video.
This was also contributed to by reversing some pieces of footage.
We used Powerpoint to create our Digipak, as this was a
programme we were both extremely comfortable with and it allowed us to do
everything we needed to make our Digipak look as true to our original ideas as
possible. We used the “Remove Bcakground” tool to layer part of an image over
one section, and used the “Grain” and “Saturation +” effects to give each image
a bright, colourful and vintage feel.
During the research and planning stages, we mainly used
Blogger to document our progress, PowerPoint and Prezi to create presentations
showing our ideas, feedback and general information regarding the music video.
These allowed us to create posts which showed our journey to creating a
fully-fledged product that we could be
proud of and which linked together in terms of synergy, band image and
creativity.
Evaluation - Question 1 script
When creating a music video, there are rules
to follow and rules you can bend to fit your creative viewpoint. A music video
must be representative of the mood conveyed by the song you are creating it
around, and tell a story influenced by the lyrics. This story can be told very
literally by linking certain words to images onscreen (insert clips of
girli/tdcc) or it can have a more metaphorical kind of feel and tell a story
that may only loosely link to the actual lyrics.
Our
video took a fairly literal approach in some aspects, with certain words
linking to the lyrics, and some key phrases from the song being shown in the
background (insert clips). This aspect of our video was influenced by the
theories of Carol Vernallis, who said a key element of a music video was to
link the lyrics to the images shown. However, on the most part, our video is
more conceptual than literal, with our main goal being to create a visual that
matched the sound and feel of the song rather than a full narrative.
During planning for our video, we watched a
lot of music videos which each provided us with some kind of inspiration,
whether it be colour scheme, certain shots or editing techniques.
Alongside multiple indie-rock artists, we
took a lot of inspiration from the punk-rock duo Slaves, particularly from the
video for their song “The Hunter”. We
took note of the heightened colours, grainy feel and the confrontational,
almost aggressive way in which they perform, and applied this to our video.
Reflecting Slaves, we decided to base the characterisation off of their
performances, filming a lot of close-ups with intense eye-contact and a
slightly deranged energy.
We had the idea to use a kaleidoscope
effect in the very first shot to establish our video as colourful and
psychedelic, which is also shown in Gerard Way’s video for his song “No Shows”.
Similarly, to Slaves, this video uses a grainy effect to create a vintage
aesthetic.
A shot we tried to replicate was a
transition shot in King Krule’s video for Half Man Half Shark – the camera is shown
to focus on an object then pan down quickly, almost like it was being dropped –
we really liked how seamlessly this lead one shot to another and felt a little
bit more chaotic as opposed to your average fade or jump-cut transition. (compare shots – 1.07 of the KK video,
blowing glitter of CS video).
Another video which inspired some shots,
editing style and the set itself was the video for Season 2 Episode 3 by Glass
Animals – this video shows a girl lounging on a sofa in a messy living room,
covered in various miscellaneous objects – this includes food, cigarettes,
cacti and clothes. We created our own version of this set which we felt suited
the slightly edgier character of Coco, but used the same basis of it being a
messy room with the sofa as the central focus. I threw some lighters, CDs,
magazines and wrappers on the floor and took various side-panning shots of
those. In terms of editing, I used the same quick cuts between shots of Phoebe,
or Coco, eating, drinking and generally lounging about.
For Lucy’s scenes, we watched a lot of
videos where a girl is the main performer, so this included Wolf Alice’s Yuk
Foo video, Kill V Maim by Grimes and Black Honey’s live videos. Black Honey are
the actual band behind our song, so we found it really helpful watching how
their singer, Izzy B Philips performed the song herself.
In terms of shots, we drew inspiration from
two door cinema club and slaves again, due to the very close-up shots of the
main artist. We also originally wanted to use a go-pro for Lucy’s scenes to get
the same kind of fish-eye lens effect, but decided to just use a normal DLSR
camera instead.
We decided to keep to some of the
conventions of the stereotypical “indie” video and do live performance scenes
throughout the video – this is shown in videos such as Kathleen by catfish and
the bottlemen, yuk foo by wolf alice and out getting ribs by king krule.
(insert clips from slaves, grimes, s2 ep3,
Gerard way with comparative shots alongside). While we consider our video to be
quite unique in terms of the narrative and mise en scene, it definitely fits
very well into the indie category of videos and doesn’t challenge conventions
very much at all. The same goes for our digipak and website, which both follow
a clear brand image and display the pink, bold, kaleidoscopic imagery shown
throughout all our ancillary texts. Our website has a simple structure and uses
photos and colours to fit in with our themes, as does the digipak which links
directly into the music video by using photos from the filming sets, bright
colours and a vintage-style television on the front cover.
Saturday, 30 December 2017
Production Diary
12/09/17 - This was our first group meeting. Our group consisted of Phoebe and Lucy (me). Phoebe and I met up in the summer and discussed some potential song choices, creating a list of our collective favourites.
During our first meeting back at school we went through the list of songs we created, editing it by adding some new ideas and taking some away. We listened to a few songs by Black Honey and narrowed it down to two Black Honey songs - Madonna and Spinning Wheel. Both songs gave us each clear imagery of potential video aesthetics and narratives.
18/09/17 - In this lesson we decided on the song Spinning Wheel. We both liked this song and we had lots of ideas of imagery, particular shots and colour themes we wanted to use within the video. We printed out the lyrics and annotated them with corrections (as the website had got some words wrong), costume and prop ideas and ideas for the narrative.

19/09/17 - In this lesson we created a PowerPoint presentation, pitching our ideas for our music video. We presented this to class, with the presentation explaining the main ideas we had for the music video and showing a small moodboard we created. This included pictures and various clips from music videos which inspired us - for example, the video for The Hunter by Slaves.

20/09/17 - In today's lesson we presented the presentation to the class and got their feedback. The class liked most of our ideas, particularly the bright colours we wanted to use and how we wanted to portray the Western vibe of the song itself. While some people were concerned that the slower pace at the beginning of the song may lead to a boring introduction, others gave us suggestions on how to make sure it didn't leave our audience bored, which we took into account during further planning.

25/09/17 - Today we wrote a list down of the props and costumes we would need for each shot. From eBay we purchased eight metres of pink sequinned fabric which we will use for the backdrop in one of our three sets. Additionally, we began to sort through various newspapers and magazines, cutting out eccentric figures and faces that we would later stick onto the sequinned fabric as part of the backdrop.
26/09/17 - Today we continued cutting out faces from magazines for our background collage.
27/09/17 - During this lesson, we obtained white paper and cardboard, then wrote out in large block letters some key lyrics form the song which we wanted to stick onto the collage backdrop. We also filmed the lip-syncing task, with me and Phoebe filming each other miming a section of our song - from this task we decided that I would be the main performer.
28/09/17 - Today we finished writing out and cutting the quotes out for our backdrop. We really like how they turned out, as they showcase the slightly rugged/homemade look we wanted to achieve. During this lesson we also planned out which props we would use for our other set.
29/09/17 - This lesson was spent planning and organising our next actions - this included attaching the lyric quotes to the pink sequinned fabric, and sticking on the magazine cutouts in order to complete our collage background. We also completed our Timeline of Annotated Lyrics task, which will enable us to refer back to it during the creation of our storyboard to see where we want a certain scene or shot to go. We also watched and peer-marked music videos from previous years.
02/10/17 - This lesson was spent building one of our sets in the green-screen room of the media department - we pinned up the pink sequinned fabric around three walls (with the help of a classmate), then stuck on the lyric quotations and magazine cutouts. It turned out exactly how we wanted it to, so we're extremely pleased with the result of our work.

03/10/17 - Today we continued sticking our cutouts to the fabric - some had to be reattached as the sticky tape we used was quite a weak adhesive. We also filmed some test shots on Phoebe's phone to get an idea of how the lighting would look and which angles would work in our limited space (we had to make sure that the green floor and ceiling would not be visible in the actual video).

05/10/17 - Today we spent two hours blogging and creating the steal-o-matic on Adobe Premiere Pro. Our steal-o-matic consists of a variety of videos form which we have taken inspiration - it was uploaded onto YouTube then embedded into a blog post.
On our blogs, we created the shooting schedule, planning to shoot my scene on the 11th. We also edited our risk assessment.
06/10/17 - Today we created the storyboard on Prezi for our music video, using pictures representative of the shots we aimed to film. We also looked at the websites of established bands and artists, making a video with a voiceover that talked about the websites and how they worked and the different pages you could click on.
09/10/17 - During this lesson, we had our progress meeting with our teacher to see how we were progressing. We created a list of tasks and assigned them to one another to ensure we would get a good amount of work done. After this, we continued creating blog posts and made an availability schedule to document when we would be filming.
11/10/17 - Today was our first day of filming. We spent 3 hours filming in the green-screen room, filming the whole song at least six different times to ensure we have a variety of shots to choose from when editing. We repaired some of our set which had fallen down during first lesson and stuck on some more magazine cutouts as the bottom of the set looked very bare compared to the top. In the next couple of hours, I changed into my costume and makeup while Phoebe took some photos of the set and updated our shooting schedule.
I had purchased a pink pair of kaleidoscope glasses which we held over the lens to create a kaleidoscopic, trippy effect for our opening shots. While it was initially quite tricky to keep the glasses held over the lens and prevent the lens itself from focussing on the glasses rather than the set, we eventually managed to find an angle we could hold them at and get the effect we wanted. Phoebe then filmed me miming the song with and without the glasses, from various heights and angles. We filmed some close-up shots for the intro, using the kaleidoscope glasses, then wider body shots for the rest of the song.

12/10/17 - In today's lesson we researched different band names. We used the Name Generator website for help and Survey Monkey to help us narrow down our choices, and eventually decided on the name "CAKE".
13/10/17 - Today we uploaded all our footage and spent an hour going through each shot and deciding which clips to keep and which ones to delete. We started out with around 100 videos but ended the lesson with 60.
16/10/17 - In today's lesson, we started to edit the intro of our video, cutting together clips of myself lip-syncing and various shots of the set.
17/10/17 - Today we filmed in our other location (my living room). The set we created had a sofa as the central point, with old magazines, CDs, shoes, food, food wrappers, clothes, posters, lighters, cacti, and alcohol bottles strewn over the living room floor. We also brought in an old TV set which would later serve as the main motif of our video. We intentionally created the messiest set we could in order to reflect the slightly dernaged personality Phoebe was trying to convey.
18/10/17 - Today we had a research lesson about Digipacks, websites and branding. We decided to rename the band from CAKE to "can't sleep", as CAKE and the photoshoot we'd planned alongside having that name had no relation to our video, whilst can't sleep gave us a lot of freedom in terms of how our video could relate to it (the phrase "I can't get no sleep" is actually shown in our video as one of the magazine cutouts) and the photos we could use for our digipak.
19/10/17 - Today we continued editing and uploaded the new clips onto the media drive. While I did this, Phoebe began creating the website on Wix.com. We decided it needed to showcase our band image with bright pink and kaleidoscopic imagery in order to fit in with our synergy - we also have our logo shown at the top of the page.

During our first meeting back at school we went through the list of songs we created, editing it by adding some new ideas and taking some away. We listened to a few songs by Black Honey and narrowed it down to two Black Honey songs - Madonna and Spinning Wheel. Both songs gave us each clear imagery of potential video aesthetics and narratives.
18/09/17 - In this lesson we decided on the song Spinning Wheel. We both liked this song and we had lots of ideas of imagery, particular shots and colour themes we wanted to use within the video. We printed out the lyrics and annotated them with corrections (as the website had got some words wrong), costume and prop ideas and ideas for the narrative.
19/09/17 - In this lesson we created a PowerPoint presentation, pitching our ideas for our music video. We presented this to class, with the presentation explaining the main ideas we had for the music video and showing a small moodboard we created. This included pictures and various clips from music videos which inspired us - for example, the video for The Hunter by Slaves.
20/09/17 - In today's lesson we presented the presentation to the class and got their feedback. The class liked most of our ideas, particularly the bright colours we wanted to use and how we wanted to portray the Western vibe of the song itself. While some people were concerned that the slower pace at the beginning of the song may lead to a boring introduction, others gave us suggestions on how to make sure it didn't leave our audience bored, which we took into account during further planning.
25/09/17 - Today we wrote a list down of the props and costumes we would need for each shot. From eBay we purchased eight metres of pink sequinned fabric which we will use for the backdrop in one of our three sets. Additionally, we began to sort through various newspapers and magazines, cutting out eccentric figures and faces that we would later stick onto the sequinned fabric as part of the backdrop.
26/09/17 - Today we continued cutting out faces from magazines for our background collage.
27/09/17 - During this lesson, we obtained white paper and cardboard, then wrote out in large block letters some key lyrics form the song which we wanted to stick onto the collage backdrop. We also filmed the lip-syncing task, with me and Phoebe filming each other miming a section of our song - from this task we decided that I would be the main performer.
28/09/17 - Today we finished writing out and cutting the quotes out for our backdrop. We really like how they turned out, as they showcase the slightly rugged/homemade look we wanted to achieve. During this lesson we also planned out which props we would use for our other set.
29/09/17 - This lesson was spent planning and organising our next actions - this included attaching the lyric quotes to the pink sequinned fabric, and sticking on the magazine cutouts in order to complete our collage background. We also completed our Timeline of Annotated Lyrics task, which will enable us to refer back to it during the creation of our storyboard to see where we want a certain scene or shot to go. We also watched and peer-marked music videos from previous years.
02/10/17 - This lesson was spent building one of our sets in the green-screen room of the media department - we pinned up the pink sequinned fabric around three walls (with the help of a classmate), then stuck on the lyric quotations and magazine cutouts. It turned out exactly how we wanted it to, so we're extremely pleased with the result of our work.
03/10/17 - Today we continued sticking our cutouts to the fabric - some had to be reattached as the sticky tape we used was quite a weak adhesive. We also filmed some test shots on Phoebe's phone to get an idea of how the lighting would look and which angles would work in our limited space (we had to make sure that the green floor and ceiling would not be visible in the actual video).
05/10/17 - Today we spent two hours blogging and creating the steal-o-matic on Adobe Premiere Pro. Our steal-o-matic consists of a variety of videos form which we have taken inspiration - it was uploaded onto YouTube then embedded into a blog post.
On our blogs, we created the shooting schedule, planning to shoot my scene on the 11th. We also edited our risk assessment.
06/10/17 - Today we created the storyboard on Prezi for our music video, using pictures representative of the shots we aimed to film. We also looked at the websites of established bands and artists, making a video with a voiceover that talked about the websites and how they worked and the different pages you could click on.
09/10/17 - During this lesson, we had our progress meeting with our teacher to see how we were progressing. We created a list of tasks and assigned them to one another to ensure we would get a good amount of work done. After this, we continued creating blog posts and made an availability schedule to document when we would be filming.
11/10/17 - Today was our first day of filming. We spent 3 hours filming in the green-screen room, filming the whole song at least six different times to ensure we have a variety of shots to choose from when editing. We repaired some of our set which had fallen down during first lesson and stuck on some more magazine cutouts as the bottom of the set looked very bare compared to the top. In the next couple of hours, I changed into my costume and makeup while Phoebe took some photos of the set and updated our shooting schedule.
I had purchased a pink pair of kaleidoscope glasses which we held over the lens to create a kaleidoscopic, trippy effect for our opening shots. While it was initially quite tricky to keep the glasses held over the lens and prevent the lens itself from focussing on the glasses rather than the set, we eventually managed to find an angle we could hold them at and get the effect we wanted. Phoebe then filmed me miming the song with and without the glasses, from various heights and angles. We filmed some close-up shots for the intro, using the kaleidoscope glasses, then wider body shots for the rest of the song.

12/10/17 - In today's lesson we researched different band names. We used the Name Generator website for help and Survey Monkey to help us narrow down our choices, and eventually decided on the name "CAKE".
13/10/17 - Today we uploaded all our footage and spent an hour going through each shot and deciding which clips to keep and which ones to delete. We started out with around 100 videos but ended the lesson with 60.
16/10/17 - In today's lesson, we started to edit the intro of our video, cutting together clips of myself lip-syncing and various shots of the set.
17/10/17 - Today we filmed in our other location (my living room). The set we created had a sofa as the central point, with old magazines, CDs, shoes, food, food wrappers, clothes, posters, lighters, cacti, and alcohol bottles strewn over the living room floor. We also brought in an old TV set which would later serve as the main motif of our video. We intentionally created the messiest set we could in order to reflect the slightly dernaged personality Phoebe was trying to convey.
18/10/17 - Today we had a research lesson about Digipacks, websites and branding. We decided to rename the band from CAKE to "can't sleep", as CAKE and the photoshoot we'd planned alongside having that name had no relation to our video, whilst can't sleep gave us a lot of freedom in terms of how our video could relate to it (the phrase "I can't get no sleep" is actually shown in our video as one of the magazine cutouts) and the photos we could use for our digipak.
19/10/17 - Today we continued editing and uploaded the new clips onto the media drive. While I did this, Phoebe began creating the website on Wix.com. We decided it needed to showcase our band image with bright pink and kaleidoscopic imagery in order to fit in with our synergy - we also have our logo shown at the top of the page.

20/10/17 - Today I continued editing on Premiere - both myself and Phoebe are pleased with how our video looks so far. Phoebe continued creating the website and made pop-art titles of our band member names (Bea and Coco) using the same font as our logo.
30/10/17 - In today's lesson we completed the Risk Assessment and begun creating our Halfway Evaluation presentation. The presentation includes artist details, band image, target audience and a teaser video. This will be presented to the class who will in turn provide us with feedback on how to improve what we have done.
31/10/17 - We continued creating our Halfway Presentation and editing the video on Premiere. We also created a To-Do list of any remaining tasks.
1/11/17 - We started to work through the To-Do list, creating a prop list and costume mood board. We also continued working on the presentation.
2/11/17 - In this lesson we continued the presentation and editing. We also drew out the storyboard, drawing small pictures of what the shots will look like and then captioning them with a brief description of the shot. We also did research into videos of a similar genre.
6/11/17 - In today's lesson we presented our Halfway Evaluation to the class - afterwards, every member of the class filled out a feedback sheet for us to take notes from.
7/11/17 - In today's lesson we put together the feedback from the class and put it into a table on Microsoft Word. We then edited the work we had done so far according to the feedback we received.
8/11/17 - In this lesson we watched other group's presentations and gave them feedback. This was beneficial to us as it allowed us to gain inspiration from other people's work.
9/11/17 - Today we continued with the editing and conventions of a digipak, and edited the official website. Due to the feedback on the website, we decided to completely change its layout and visuals.
10/11/17 - In today's lesson we continued with the website, creating more pages. We also created more merchandise and a store page on which to sell it.
13/11/17 - Today we continued editing and importing new footage. We also continued updating the blog and creating the website, then planned out a shooting schedule for the glass smashing scene that we plan to film tomorrow.
14/11/17 - Today we filmed the glass-smashing scene. We filled a clear glass bottle with sequins and glitter, and after obtaining permission from our school's site manager, we filmed Travis smashing the bottle against the side of a building at school. We enlisted the help of Bethanie,Travis, Faith and Leah when filming, shooting on three different camera including two iPhones and my DSLR. The bottle turned out to be too thick to smash on the wall, but Travis had the idea to drop it, which worked on the first try. While it wasn't what we originally planned, me and Phoebe were happy with the result.
15/11/17 - Today we uploaded and reviewed the footage we shot yesterday. In addition to this, Phoebe also did a lot of research to post on our blogs. This included performance inspiration, artist research,social media and merchandise research. This research will really help us when reviewing the work we have done and allows us to fully understand all aspects of the music industry.
16/11/17 - Today, Phoebe her time recreating the website, designing various pieces of merchandise and an online store on the website. She also created news pages, social media links, galleries and contact pages. I continued editing the video.
17/11/17- Today we continued editing and we showed our teacher our second draft of the website. She then recorded a screengrab and voiceover, giving feedback on the website.
20/11/17 - Today we worked on the digipak, creating our full first draft. We got feedback from multiple peers and then began to edit accordingly. We also updated the blog with our workings.
21/11/17 - Today we started magazine research and continued editing. Our friend Josh, who is extremely good at editing, gave us some ideas for editing which we then used in our video.
22/11/17 - In today's lesson we added another 30 seconds to our music video and began creating and designing our magazine cover.
23/11/17 - Today we carried on editing. I tried out and added various effects over the top, the result of which we were extremely happy with. We also did further research into music magazines and finished creating the first draft of our own magazine cover.
24/11/17 - Today we got the feedback from our magazine cover. We asked our teacher to look it over and some of our fellow classmates. We also did research into different interview styles and we planned out what our interview would be like.
27/11/17 - Today we continued editing and then in the afternoon, we asked our friend Travis to be the presenter in our interview. We then filmed the interview in the music room but when we watched it back we realised that the setting of the interview did not look good and therefore the final film was not what we wanted so we decided to film again tomorrow.
28/11/17 - Today we finished the second draft of the website. We added extra pages (videos, bio and news) and edited these accordingly. We also finished the second draft of the digipak - adding the borders, barcode and credits. We also re-filmed our interview in a different location with a different presenter, as the first one did not come out how we wanted it to. We then created a presentation documenting our progress ready to present to the class on Thursday and get their feedback, in order to edit and improve anything they suggest.
29/11/17 - Today we edited the final 30 seconds of our video for the first draft. We also edited the interview and uploaded it onto the website.
30/11/17 - In class we presented the first draft of our music video and got feedback from our class members. The feedback was extremely positive and gave us many ideas on how to improve. We then watched the videos from other groups which allowed us to see how our work differs in comparison.
4/12/17 - In this lesson we caught up on our blog posts.
8/12/17 - Today we focused on editing our music video according to the feedback we received in class.
11/12/17 - Today we uploaded all the feedback we received from our class mates about our website, then posted our digipak and music video. We also spent the hour evaluating and giving feedback to the other groups in our class.
12/12/17 - Today we created a tour poster for our band. We made it on the website CANVA, which is an extremely simple software to use and gives a high standard finish.
14/12/17 - In today's lesson we continued editing and blogging. We then finalised the digipak and websites and uploaded them onto the blog.
15/12/17 - Today was our deadline so we spent the day editing the music video, finalising parts of it and then exporting to post on YouTube. We are extremely happy with the outcome and can only see a few tiny things that we would want to change - the final version received positive feedback from peers and our teachers. After this, we spent some time completing blog posts.
Subscribe to:
Posts (Atom)

-
The list of songs me and Phoebe created for our album: TUMBLEWEED CLOWNS MAKE ME CRY SEAGULLS 3000 SEQUINS PINK HEARTS CACTI NOT TODAY SATA...
-
Props used in green screen room shoot: Microphone Microphone stand Heart-shaped glasses Kaleidoscope glasses Glitter
